SSHFS

Most developers often need to perform some work on remote systems which are accessible via SSH. For performing minor changes it is fine to SSH into the system and edit the files directly, but for more complex changes that involve a larger set of files the comfort of an IDE would be nice to have. For such situations the SSHFS filesystem client comes to rescue.

Using an SSHFS client we can mount a remote system as a local drive/folder. This allows us to perform any operation on mounted files with the tools we are used to. For example, we can open a remote project in our favorite IDE or process the remote data with local specific tools.

The only server requirement for getting SSHFS to work is to have SSH enabled. The clients usually support both password and private key logins.

The process of installing and using the SSHFS client on different Linux flavors is outlined here in great detail, with examples.

For Windows, the win-sshfs client can be used. The original project was hosted on Google Code but several forks have been created from it. A very detailed post outlines the installation and usage of win-sshfs on Windows 10 and recommends the usage of the dimov-cz fork. However, the latest version of that fork did not work with the .Net version on my work Windows 7 machine and as I didn’t want to upgrade it I reverted to the original win-sshfs, version 0.0.1.5, which can be downloaded from the Google Code archive. This works just fine for me.

Note that all versions of win-sshfs require that Dokan is installed, which is a user mode file system on top of which win-sshfs was developed.

Once the win-sshfs client is installed, configuring and mounting a remote system is straightforward.

Analogue Hi-Fi System with Raspberry Pi

Over the years my MP3 collection has been increasing in size but I didn’t have a good setup that would allow me to effortlessly listen to my MP3s on a quality system. I had a relatively decent Sony “micro Hi-Fi” system to which I could stream music from my laptop or phone via bluetooth or just plug a USB with music, but the bluetooth range was poor, the connection unreliable and navigating through music on a USB flash drive is not really a comfortable operation.

I recently decided to rip all of my CDs to MP3 and setup a system that would allow me to listen to them on a quality system and have a flexible way to control it.

The equipment that I already had is:

  1. QNAP TS-269 Pro NAS server. I use this server for many different things, and this includes a centralized library of MP3 music. My new setup would have to play music directly from the NAS so that my full collection can be accessed.
  2. An old analogue Pioneer A-656 amplifier plus a pair of old Sony speakers
  3. A local ethernet network (cables, switch)

After reviewing different available options, I decided to go for a system based on Raspberry Pi, the credit card-sized computer, running RuneOS. RuneOS is an Arch Linux based system that can act as a headless audio player, meaning that you don’t need a monitor and keyboard to control it, in other words it can be remotely controlled by clients running on different devices in a network, like laptops, smartphones and tablets around your home.

The following diagram from the RuneOS website describes my new setup:

runeos-how-it-works

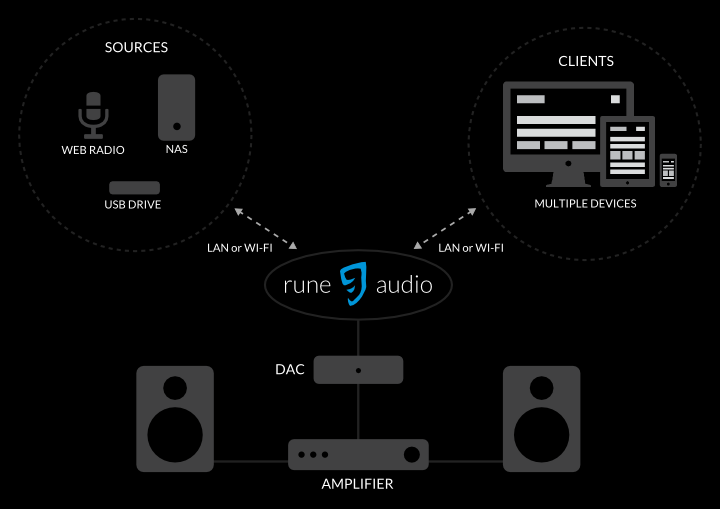
The box labelled “rune audio” in my setup represents the Raspberry Pi computer running on RuneOS (Rune Audio).

So, I got me a Raspberry Pi 2, which can output audio in two ways:

  • analogue through a headphone jack
  • digital through HDMI

Since my amplifier is an analogue one, I couldn’t use the preferred digital output. On the other hand, almost all reference I found about the analogue RPi output suggest the usage of an external DAC (Digital-Analogue-Converter) since the internal DAC on the RPi is apparently not up to the task, i.e. it doesn’t produce sound of acceptable quality.

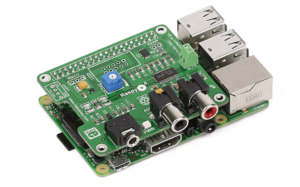
This means that I had to shop for an appropriate DAC. Fortunatelly, I found a thorough list of DACs specifically tailored for the RPi. Being from Serbia, I naturally chose the Raspy Play4 DAC for $39 (they ship worldwide). As they say:

“This add-on board features the PCM5122 DAC with excellent dynamic performance for audiophile-worthy reproduction of your favorite music, on a budget”

This is the Raspy Play4 alone:raspyplay4

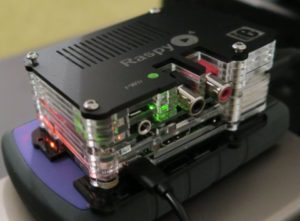
And here it is connected to the Raspberry Pi:

rpi_raspyplay4

Now that I had all the hardware, I wanted to put it into a nice casing (although some may argue that the bare bone system looks very attractive too!). I opted for a Serbian designed casing called RaspyPlay4 Layerstyle. The design is open source so you can download it and cut your own case, or you can order from them directly (it costs around $10 without shipping).

This is what the box looks like once (almost) assembled:

rpi_raspyplay4_case

In order to complete the hardware setup, connect this little computer to the analogue amplifier using a standard RCA audio cable.

With the hardware setup complete, what remains to be done is to setup the software, which consists of flashing the Rune OS image on an SD card and configuring it. These steps are nicely documented on the Rune Audio site.

So, what did I get with this?

  • I got a system which can play my whole music collection from a NAS server in my home
  • The sound quality is great
  • I can control the music (playlists, volume, etc) from my laptop, smartphone or tablet
  • Rune Audio allows me to configure web radio stations, so I can listen to those too

Display Note Dates in NoteCase Pro

NoteCase Pro is my choice when it comes to note keeping applications. This is a powerful cross-platform application that contains an impressive set of built-in features, but also provides a mechanism for extending the functionality via plugins and user scripts in the Lua scripting language.

While reading or working on a note I often need to be aware of the date when the note was first created or last modified. NoteCase Pro keeps this information in the notes database and the UI can be configured to present these dates in the note tree, but I wanted a solution that doesn’t clutter the interface. So I wrote a short Lua script that displays these dates in the status bar.

The script makes a few calls to the NoteCase API and formats the output in the desired way:


-- get IDs for the current document and note and store as variables
nDocID = Nc_Doc_ID_GetCur()
strNoteID = Nc_Note_ID_GetCur(nDocID)

-- get the dates
strDateCreated = Nc_Note_DateCreated_Get(nDocID, strNoteID)
strDateModified = Nc_Note_DateModified_Get(nDocID, strNoteID)

-- Format the output string

-- The string below would use the default timestamp format: yyyy.mm.dd hh:mm:ss
-- strOut = "Created: " .. strDateCreated .. ", Last Modified: " .. strDateModified

-- Let's convert to a more readable format
-- First parse the captured timestamps
pattern = "(%d+).(%d+).(%d+) (%d+):(%d+):(%d+)"
crtYear, crtMonth, crtDay, crtHour, crtMinute, crtSeconds = strDateCreated:match(pattern)
modYear, modMonth, modDay, modHour, modMinute, modSeconds = strDateModified:match(pattern)
-- Then form the output string
strOut = "Created: " .. crtDay .. "/" .. crtMonth .. "/" .. crtYear .. " ..... Last Modified: " .. modDay .. "/" .. modMonth .. "/" .. modYear

-- Finally, show status bar message in black text
Nc_GUI_StatusBarMessage(strOut)

We save the script in a text file somewhere in the file system. The script gets registered by the application in the Script Manager dialog (Add-ons -> Script Manager).

Scripts can be mapped to Script Events, which would get them invoked by the application on specific events. My initial idea was to assign my script to the ‘After note focused’ event so that the dates would get printed on the status bar whenever a new note is displayed, but alas, NoteCase overwrites the status bar with some information after this event.

So instead of mapping my script to an event, I assigned it a shortcut key in the Shortcut Settings dialog (Tools -> Shortcut settings). This way, whenever I want to inspect the note creation and last modification date of the presented note I press the shortcut combination and the dates get shown in the status bar.

It is also possible to add a button to the toolbar through the Toolbar Settings dialog (Tools -> Toolbar Settings) by copying the corresponding ‘Lua script’ entry from the ‘Available actions’ list to the ‘Toolbar layout’ list.